Grades Journey
Grades Journey is the mechanism for transferring marks from Blackboard Gradebook to SITS. When you create a Turnitin or Blackboard assignment, or Blackboard test, etc., a column is automatically created within the Gradebook to hold the marks. You can also manually create columns in the Gradebook for offline activities, such as presentations, in-class tests, and exams.
All Assessment columns used in weighted calculations must be graded out of 100. If any column uses a different point value, the weighted column will calculate an incorrect final grade.
When you grade work in Turnitin or Blackboard, the score automatically populates the corresponding assignment column in Gradebook. To send marks to SITS, you'll use the Grades Journey Column (labelled SEQ), which is automatically created when the module is set for Grades Journey within the Module Manager. You must map the mark from the assignment column to the Grades Journey (SEQ) Column. Once the module coordinators agree and finalise the marks, you can transfer the marks from the Gradebook to SITS.
Frequently Asked Questions
What are the requirements for using Grades Journey?
There are only three requirements to use Grades Journey.
- The module must be signed up for Grades Journey in SITS.
- The module must not be a parent/child module.
- All assignments used in the module as part of Grades Journey must be marked out of 100.
How do I participate?
Modules must be signed up to Grades Journey via the Module Manager functionality of SITS. Once this has been completed, Grades Journey weighted columns will appear in the module’s Grade Centre before the college's assessment periods.
Can I use Grades Journey without Blackboard assignments or with offline assignments?
Yes, you can create grade columns in the Grades Centre that are not tied to specific assignments. You can put the results of offline assignments into these grade columns and then map them to the Grades Journey weighted columns.
Why am I seeing a ! (exclamation mark) notification on Gradebook?
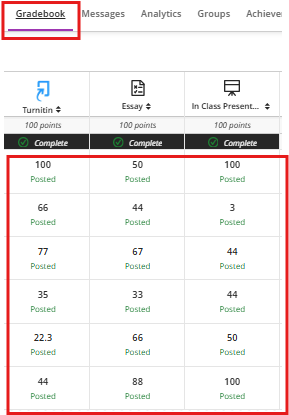
You are seeing a purple ! as a Gradebook notification because you have not posted (released ) marks to your students. When you post (release) marks to your students the ! will disappear. This only happens when you are using Grades Journey and has been logged with Blackboard to fix.
Unposted Marks
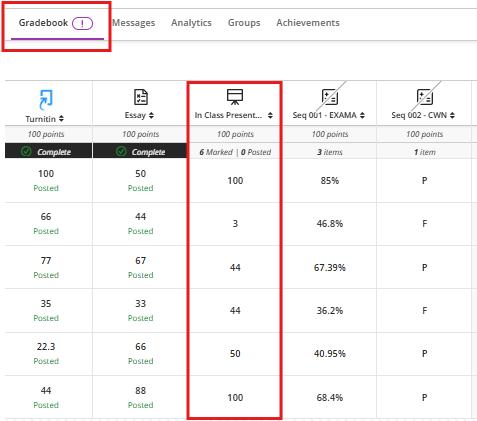
Post Marks
Can I still upload marks and grades directly into SITS?
Yes, nothing will change regarding the standard uploading of marks and grades into SITS. Even after the module has transferred, marks and grades can still be edited in SITS.
What happens if incorrect mark/grade information is passed to SITS?
If incorrect data is transferred, it can be updates, amended or deleted in SITS
Can Grades Journey be used for exams?
Grades Journey can be used to transfer exam marks.
Can Grades Journey be used for reassessment?
Grades Journey cannot be used for reassessment.
Can I sign my module up for Grades Journey and then decide not to use it?
Yes, there is no requirement to use Grades Journey if your module has been set up to use it.
Calculation Columns
Purpose
- Combine data from multiple sources in the gradebook to display a grade based on the selected schema.
Considerations
- The "Total Calculation" columns are commonly used to provide students with an alternative view of the "Overall Grade", where one is expressed in points and the other in percentages or letter grades.
- Calculation columns are commonly used to calculate a score based on a selection of coursework.
- They can be used in calculations in other calculation columns.
- These columns will not be visible to students unless a grade is entered and the item is marked as visible to students.
Adding a Calculation Column
- Go to either the Gradable Items or the Grades view in the course Gradebook.
- Hover over a line between two gradable items and click on the "+" that appears.
- Select "Add Calculation".

- Enter a descriptive name for the calculation column.
- Select a grade schema from the dropdown menu.

- Create your calculation formula by clicking on items in the left pane, adding them to the right pane.
- Functions and Variables
- Average: Calculates the average for selected categories, individual items or other calculations.
- Total: Generates a total based on points allowed compared to cumulative points.
- Minimum: Determines the minimum grade within selected categories. This could be used for calculations where the lowest grade in a category is dropped.
- Maximum: Determines the maximum grade within selected categories. This could be used for standards- or proficiency-based grading, where only the highest grade counts.
- Variable: Select an individual graded item. This could be used for weighted calculations.
- Operators: +, -, /, *, (, ), or a numeric Value
- Functions and Variables
- Specific categories or individual coursework items can be selected within the "Functions and Variables" section by hovering over a function in the right pane and clicking the dropdown arrow.

- Functions or variables can be removed from a calculation by hovering over them and clicking on the "x" within a circle.
- Once your formula is complete, click on Validate to check if any errors will prevent the calculation from occurring.
- Press the Save button.