The below information only pertains to staff and postgraduate students using computers connected to the College network via: the wired network in offices and labs, the staff Wi-Fi service, the VPN service.
Trellix Anti-Virus Software
Trellix (formally McAfee) is an IT security solution that runs on both Windows and macOS computers.
Starting in 2024, IT Services will be rolling out the Endpoint Management for Cyber Security project.
This will lead to a change in the anti-virus and IT security protection software used on all College devices.
- All existing Windows and macOS computers, on the main wired network and Staff Wi-Fi network, will have their anti-virus and IT security protection software migrated, by IT Services, from Trellix to Microsoft Defender.
Devices that have not yet made the switch will continue to run the Trellix anti-virus software.
Check which anti-virus solution your device is currently using
There are two pieces of software staff must install on their Windows or Mac computer to ensure their machines and the Trinity network are protected from virus outbreak.
They are Trellix Agent and McAfee Endpoint Security.
The Trellix Agent enables us to remotely monitor anti-virus software on client PCs and McAfee ePO for Macs. In the event of a virus outbreak we can force updates on client machines and identify infected machines.
A small ePO 'agent' file is installed on each client PC and Mac which reports back details to our ePolicy Server. The agent service runs silently and hidden in the background and has no negative performance effect on any other application.
Computers which have the ePO agent installed can have their virus definitions and Endpoint Security engine automatically updated, and have a daily scan automatically scheduled.
The installation of this ePO Agent is a pre-requisite for connection to the College network in offices and labs as well as to connect to the staff VPN and Wi-Fi services.
Installation and configuration instructions for both Windows and macOS are detailed below.
Windows
Before you begin
- Ensure that Trellix Agent and McAfee Endpoint Security are not already installed.
- Click Start and type 'Add or remove programs' and then select that option
- Scroll through the list and check that Trellix Agent and McAfee Endpoint Security Platform are listed. If so, you already have these programmes and do not need to install further.
- Uninstall any other preinstalled anti-virus software.
- Click Start and type 'Add or remove programs' and then select that option
- From the list of applications select the appropriate application to remove and follow the instructions on screen. It is advisable to reboot your PC to allow complete uninstallation of the existing software.
- Ensure you are connected to the Trinity data network - either via wired, Wi-Fi or a VPN connection.
Installation and configuration steps for Windows
Installing Trellix Agent
- Save your files and shut down any open programs.
- Launch the ' Run' dialog box by holding down the Windows key and hitting R, or by launching Run from the Start menu
- In the 'Run' dialog box, beside 'Open:' enter the following and click OK:
\\ntserver-usr\Virus\PC\McAfee\Windows Agent
Or
\\ntserver-usr.tcd.ie\Virus\PC\McAfee\Windows Agent - Double click the FramePkg file and at the User Account Control window, Select Allow or Yes
- When the McAfee agent and Updater setup is complete click OK to 'Setup completed Successfully'
Configuring McAfee Endpoint Security for Windows
Once the ePO Agent has been installed, and once your PC is connected to the College network, then McAfee ENS will be automatically installed within 15-30 minutes.
Endpoint Security Updates and Running a Scan
The software is automatically configured to receive daily updates from a central server.
Run the Update Task
The Auto update task automatically checks for Anti-Malware and engine updates on a daily basis. When an emergency update is required, IT Services will push the new update to all networked machines.
To manually run the Auto Update task:
- In Windows 10/11, Right click on the Trellix icon in the system tray and select Trellix Endpoint Security.
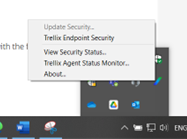
- Once the Endpoint Security interface opens click 'Update Now' button to update the security software
- When the update completes click Close.
Scan for Threats
A weekly Full Scan is configured to run every Thursday afternoon, the scan is managed by the Trellix server and cannot be cancelled or modified.
ENS is continually running an ‘on access scan’ in the background.
If you wish to run a scan you access the ENS interface as outlined above.
Once you have accessed the interface click on 'Scan System' you will then be presented with the following options for Quick Scan or Full Scan

To scan external media (such as memory keys or external hard drives):
- Insert the external media
- Click Start - Computer
- Right click on the drive letter the media is connected to and click on ‘Scan for threats…’
macOS
Before you begin
- Ensure that ePO Agent & Trellix Endpoint Security are not already installed.
- Check the top right of the screen to see if there is a Trellix icon displayed as shown below.
- If this is not displayed, then neither the ePO agent nor Endpoint Security is installed on your Mac
- Check the top right of the screen to see if there is a Trellix icon displayed as shown below.
- Uninstall any other preinstalled anti-virus software.
- Ensure you are connected to the Trinity data network - either via wired, Wi-Fi or a VPN connection.
Installation and configuration steps for macOS
Installing ePO Agent
You must be connected to the Trinity data network (via wired, Wi-Fi or VPN connection) to proceed with these steps.
- On your Mac click Go on the top menu and select Home
- Create a New Folder called 'mcafee'
- On your Mac click Go on the top menu and select Connect to server
- Enter the following server address:
- smb://ntserver-usr/Virus/Mac/
- When prompted, enter your Trinity Username and Password
- Copy the file install.sh to the 'mcafee' folder you created in step 2
- Open the Terminal app which is found in Utilities
- At the prompt type cd mcafee
- Paste the following command sudo chmod +x install.sh press Enter
- Enter your Mac password (Note as this is Unix the cursor remains static) press Enter
- Paste the following command sudo ./install.sh -i then press Enter
- The agent install will complete with the following message - 'Starting McAfee Agent services... [OK]
Configuring Endpoint Security for Mac
Shortly after installing the ePO Agent, you will see a Trellix icon in the top right of your screen.
You will also receive the following message.
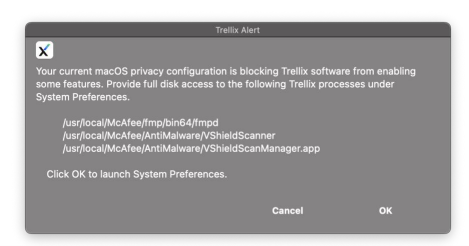
To resolve this message:
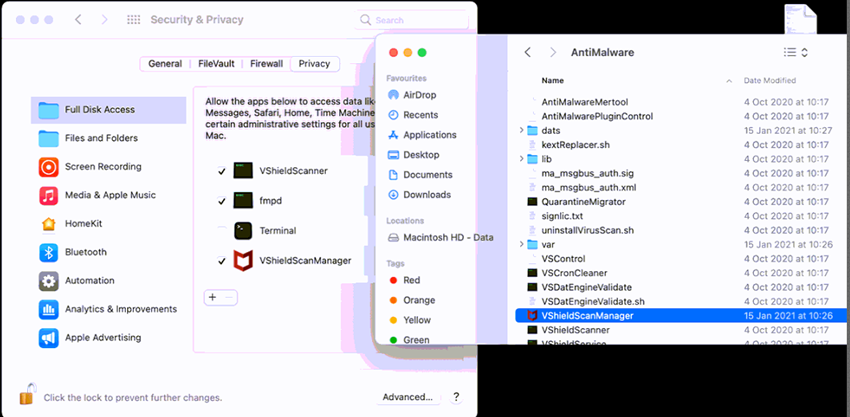
- Go to System Settings > Privacy & Security
- Click on Full Disk Access on the right hand side
- Click the toggle button beside VShieldScanManager

- Enter your MAC password
If any of the three processes including fmpd, VShieldScanner, and VShieldScanManager is missing, do the following:
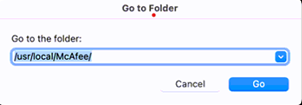
- Press Shift+Command+G on the keyboard
- Enter /usr/local/McAfee and select Go
Running a Scan on macOS
Follow the steps below to run a scan on macOS.
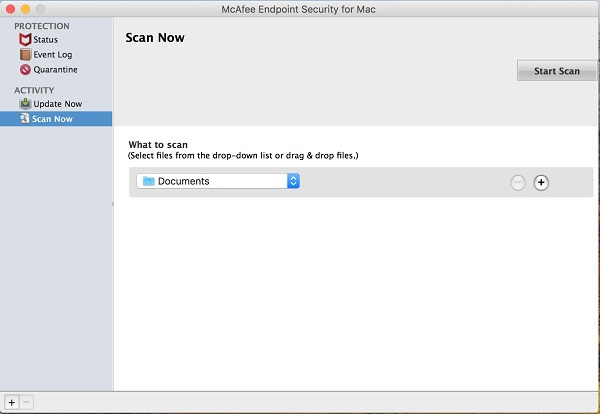
- Click on the Trellix menu and select Console
- Under Activity select Scan Now, from here you can select what to scan before clicking on the Start Scan button.
Frequently Asked Questions
Windows
Trellix Management of Native Encryption dialog window repeatedly appearing on-screen
The issue where the Trellix (formerly known as McAfee) Management of Native Encryption Dialog Window is repeatedly appearing on-screen and will not accept the Trellix Encryption password is due to a specific version of a hardware chip in the microprocessor on older computers. This chip is a manufacturer’s specific version and the chip cannot be upgraded.
If you are affected by this issue, please contact the IT Service Desk for assistance in resolving the issue.
macOS
The FAQs below relate to McAfee Endpoint Protection for Mac version 2.1 that can be installed on macOS 10.7 and later
Problems Installing McAfee ePO Agent for Mac?
When trying to open McAfee Agent for Mac.pkg you may receive the following error:
“McAfee Agent for Mac" can't be opened because it is from an unidentified developer
This error occurs because Gatekeeper options are set to "Mac App Store and identified developers". GateKeeper options can be found in System Preferences - Security & Privacy - ‘General’ Tab. If you are getting a security warning then the problem is that the package is not trusted. There are a few methods to work around this.
- The simplest and easiest way is to control-click (or right-click) the downloaded app. Select Open from the top of contextual menu that appears. On the ensuing dialogue box, choose ‘Open’ as well. Note that this will exempt this file from Gatekeeper. Enter an Administrator username and password if prompted.
- Change setting to allow applications downloaded from Anywhere to be installed. This is the least safe method, and is not normally recommended. All downloaded apps will no longer be stopped or checked for authenticity by Gatekeeper. This will allow you to run any downloaded piece of software (but will still warn you that you are opening a potentially unsafe program).
Once the application has started to install continue from Step 5 in the installation instructions above.
To get more details on GateKeeper please see the Apple support site below ->
http://support.apple.com/kb/ht5290
How do I check if the virus definitions are up to date?
- Launch McAfee Endpoint Protection for Mac Console via the red McAfee shield icon in the system tray at the top right of the screen.
- Select Update now from the list on the left hand side
- The current installed update details will be shown and the important items are the DAT Version and the DAT Creation Date
How do I manually update my Virus Definitions?
- Launch McAfee Endpoint Protection for Mac Console via the red McAfee shield icon in the system tray at the top right of the screen.
- Select Update now from the list on the left hand side.
- On the right select Start Update and when the Update in Progress is complete you can close the console.
Some Items have Yellow Exclamation signs in the Console Dashboard
McAfee Endpoint Protection for Mac that is used for College only enforces the Scanning functionality of the application. This includes the On-Access Scan and the Spyware Scan. In the Dashboard these items will have checkmarks beside them. The two options not enforced are Application Protection and Desktop Firewall and these will have a Yellow Exclamation mark beside them when looking at the Dashboard.
When I check the Update Schedule the option is set to Never
When the McAfee ePO Agent for Mac (as per instructions above) is installed it manages the update schedule for McAfee Endpoint Protection for Mac. To avoid the update running twice in one day the Agent disables the Update process and uses its own task to manage updates.
How do I uninstall McAfee ePO Agent for Mac?
- Switch to Finder and chose Go - Utilities from the main menu. Double click on Terminal to open the Terminal window and run the command below
- sudo /library/mcafee/cma/uninstall.sh
- When you hit enter you will be prompted for a password. This will be the local Mac administrator password. The administrator account is a standalone account for the Mac which you will have configured when first setting up the Mac, and is not related to your Trinity network login password. Note that the characters will not appear on screen as you are typing them in.
- You should get a message in the Terminal window that states that Agent Uninstalled
- You can then close the Terminal application.

How do I uninstall McAfee Endpoint Protection for Mac?
- Switch to Finder and chose Go - Utilities from the main menu. Double click on Terminal to open the Terminal window and run the command below
sudo /usr/local/McAfee/uninstall EPM

Please note that the uninstall command is case sensitive - When you hit enter you will be prompted for a password. This will be the local Mac administrator password. It is a standalone account for the Mac which you will have configured when first setting up the Mac and is not related to your Trinity network login password. Note that the characters will not appear on screen as you are typing them in.
- You should get a message in the Terminal window that states that Product has been uninstalled Successfully
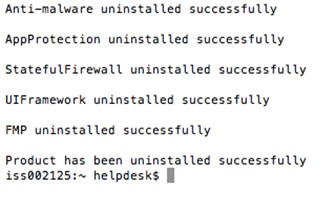
- You can then close the Terminal application. Please restart your Mac to complete the uninstallation.

